Setting Up Request Management
The Application Setup - Request Management page is part of the Application Setup workspace. Use this page to customize how the Service Desk handles request management processes.
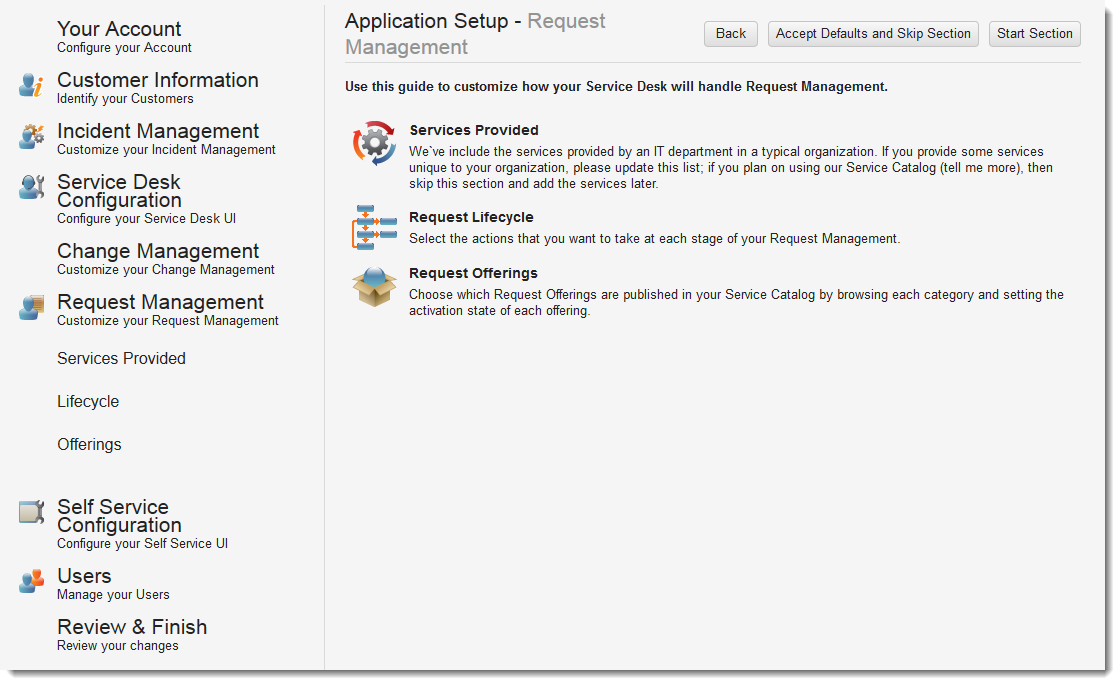
Application Setup - Request Management Page
This is one step of the application setup process. For more information about this process, including how to access this page, see Setting Up the Application.
See the following sections:
•Defining the Services Provided
•Defining the Steps for the Request Lifecycle
•Determining the Request Offerings for the Service Catalog
Defining the Services Provided
Use the Application Setup - Services Provided page to add and manage the services provided by your IT department. You can customize this set or save them and return later to add or update the services.
You can support the following services:
•Application development service
•Benefits management
•Communication service
•CRM service
•Data service
•Demo service
•Desktop service
•Email service
•Employee administration
•Employee development
•Enterprise application service
•Facilities management
•Financial service
•HR application
•IT general administration
•Mail service
•Mobile communication
•Network service
•Payroll administration
•Printing service
•QA
•Server administration
•Service desk
•Supply chain
•Travel management
•Web hosting service
Follow these steps:
1.Click Services Provided. The application displays the Application Setup - Services Provided page.
2.To add a new service, do the following:
| a. | Click Add Service. |
| b. | Enter a name and description for the new service. |
| c. | Click Save & Activate. The application adds the service to the list and makes it active. By default, each service is active and available for customization. |
3.Click Edit to edit the description of a service.
4.Click Next to go to the next page.
Defining the Steps for the Request Lifecycle
On the Application Setup - Request Lifecycle page, you select the actions to take at each stage of your request management lifecycle. If you have advanced lifecycle requirements, you can define them later.
The default request management lifecycle settings are:
•Service request created using Service Catalog
•Request item workflow initiated
•Approval required
•Approved
•Notification sent to customer
•Task created
•Notification sent to owner and team
•Task completed
•Notification sent to requester
•Service request closed
Follow these steps:
1.Click Lifecycle. The application displays the Application Setup - Change Lifecycle page.
2.For each change lifecycle stage, check the quick actions to occur.
3.To automatically send an email when the application updates the change to the associated status, do the following:
| a. | Check Send Email. |
| b. | Use the associated drop-down list to select a notification type, such as Send Notification when Service Req is fulfilled. |
| c. | Click Preview Email to preview the message. |
4.To add another quick action to this lifecycle stage, do the following:
| a. | Click Add another action. |
| b. | Select a quick action type. You can select from the following quick actions: Composite, Insert Child Object, Run For Child, Send Email, and Update Object. |
| c. | Select a quick action. The application lists the quick actions that are associated with the selected quick action type. |
| d. | Click Save. |
5.Click Next to go to the next page.
Determining the Request Offerings for the Service Catalog
On this page, you determine the request offerings to publish to the Service Catalog.
|
Category |
Request Offerings |
|
Application Administration |
New application access request Web site move request |
|
Communications Services |
Audio conferencing services Mobile network access Mobile phone request Mobile smart phone request New smart phone request Video conferencing services |
|
Facilities Services |
Conference room reservation Elevator servicing Escalator servicing Heating and cooling Lighting New office equipment Office move Shipping and mailing request Travel request |
|
General Services |
Frequent traveler setup Overnight standby request Request for information/documentation Request for new service offering |
|
HR Services |
Address change Benefits package claim Benefits package enrollment Benefits package waiver Bonus request Direct deposit Employee termination Employee transfer Federal exemption update Leave request Name change New employee setup Order business cards Performance improvement action Personal information update Shift differential request Time off request Training course request Tuition assistance request |
| IT Services |
Archived - Optional software installation request Archived - Optional software multiple installation request Copy request Create distribution list Data backup Data restore Desktop computer loaner Domain password reset Equipment return FTP request Hardware provisioning Laptop computer laoner Loaner equipment request Mailbox quota request Multiple software request (legacy) New computer request (legacy) New email account Optional software installation request Optional software multiple installation request Release quarantines attachment Reprovision computer request Request computer accessories Software installation request (legacy) Software uninstallation request (legacy) System access Tablet request Web site access request |
|
Report New Incident |
Account lockout - domain Account lockout - HR application Cannot access drive X Daily backup failure Desktop application failure Email - Cannot open Outlook Mobile phone - email issue New incident No dial tone on my phone PC is very slow Printer out of toner Voicemail problem VPN connection failure |
1.Click Offerings.
2.Check Show offerings for deactivated services to show the request offerings for deactivated services.
3.Highlight a service to display all of the service requests that are associated with it.
4.To rename a request offering, do the following:
| a. | Click Rename. |
| b. | Edit the name. |
| c. | Click Save. |
5.By default, all request offerings are activated for customer access. Click Deactivate next to the request offering name to deactivate a request offering for the entire organizational. Click Activate only to activate it again.
6.To manage the active request offerings for each organization, do the following:
| a. | Click Edit Subscriptions. |
| b. | Check All customers in my company are entitled to this service to make this request offering available to everyone. |
| c. | To make the request offering available to only certain customers, uncheck All customers in my company are entitled to this service and check the groups to make this request offering available to. |
| d. | Click Save. |
7.Click Next to save your settings and go to the next page. See .